Well - here we are at the last day of November. It is hard to believe that December is upon us and Christmas is just around the corner.
We have just come through the Thanksgiving holiday. At our house this year, it was over a week long event (and I loved it!). My parents came in last Friday afternoon, our daughter, son in law, and the 3 most beautiful grandchildren in the world arrived later that evening. We had a great time with all of them here - played games, checked the cows, and the son in law even got to go out hunting as we set up a deer feeder in our back pasture. They had to head home on Monday, but my parents stayed. Our son came in from college on Tuesday evening and the guys got to have some time together on Wednesday. Thanksgiving day was a bittersweet day. My sister and her boys came over to spend the day with all of us - their first without my brother in law, who passed away in June after a long battle with ALS. We missed his laugh, his sense of humor and his love for all of us!
The day was filled with tears, laughter, games, football and of course food. The guys also got to go out to the ranch to do some target shooting - think they enjoyed it! Games of choice were Spades and 42. We were blessed to have everyone here and love the time spent with family.
My parents and our son left this morning - sure was quiet!
This is a food blog so I am getting to the food. We did not have a "traditional" Thanksgiving meal. No turkey and dressing. Instead we opted for beef. The brisket was excellent - cooked all night long with the Red Mud sauce (Thank you again, Lane and Susi Thompson) and it was so tender, juicy and had great flavor. We had baked beans, cole slaw, cheesy potatoes, green beans with tomatoes, cowboy biscuits, pecan, pumpkin, and chocolate merignue pies. it was excellent! I am sharing 2 recipes today. The baked beans is actually my mother in law's recipe and is one of our favorites. The pumpkin pie is one that I ran across several years ago and it is the best one yet! Hope yall enjoy!
Baked Beans
3 cans (15 oz.) Van Camp's pork and beans
1/2 cup brown sugar
1 Tbsp. prepared mustard
1/4 cup ketchup
1 tsp. Worcestershire sauce
1 tsp. dried, minced onions
1/4 tsp. dried red peppers
4 slices bacon, cut in half
1/4 cup brown sugar
Preheat oven to 400 degrees.
Combine the first 7 ingredients in a oven proof dish. I use a 13 x 9 pyrex dish for mine. Stir all ingredients together. Place bacon slices on top and sprinkle the remaining 1/4 cup of brown sugar over the bacon (this will carmelize as the bacon cooks on top of the beans and give a great topping).
Cook for 45-55 minutes until bubbling and thick.
Pumpkin Pie
(from Borden)
1 9" unbaked pie shell (see earlier post for recipe)
1 can (16 oz) pumpkin
1 can (14 oz.) Eagle Brand Sweetened Condensed Milk
2 eggs
1 tsp. ground Cinnamon
1/2 tsp. ground Ginger
1/2 tsp. ground Nutmeg
1/2 tsp. Salt
Preheat oven to 425 degrees. In large mixer bowl, combine all ingredients except pastry shell; mix well. Pour into pastry shell. Cover crust with a circle of foil or a pie crust cover. Bake 15 minutes. Reduce oven temperature to 350 degrees; bake 35 - 40 minutes longer or until knife inserted 1 inch from edge comes out clean. Cool Garnish as desired. Refrigerate leftovers. Serve with sweetened whipped cream.
Texas Country Cooking

Saturday, November 30, 2013
Sunday, November 17, 2013
Flat Enchiladas
This is a staple at our house. My children actually thought that Mexican food was a major food group when they were growing up - we had some version at least once a week. This is a very easy recipe to put together but is very filling. You can add a salad, chips, salsa, guacamole - anything you like to finish out the meal.
Ingredients:
Corn tortillas
1 lb. ground beef
1 tsp. salt
1 tsp. cumin
1 tsp. Spicy Montreal seasoning
1 can Ranch Style Beans (you can use refried beans or pinto beans)
1 can Enchilada Sauce
Cheddar Cheese - grated
Tomato - chopped
Avocado - chopped
Salsa
Guacamole
Sour Cream
Heat a skillet to brown ground beef. Add ground beef, salt, cumin and Montreal seasoning. Cook, scrambling the beef until it cooked through with no pink. Keep warm as you prepare the tortillas. To cook the corn tortillas, heat oil in a small skillet (needs to be large enough to hold the tortillas). Once oil is hot, cook corn tortillas, one at a time. Place carefully in oil, count to 3, turn over, count to 3 and remove to a paper towel lined plate. Continue cooking until you have enough for at least 2 per person.
Heat beans and enchilada sauce - I just put in bowls and heat in the microwave.
To prepare the enchiladas - place one corn tortilla on a plate. Add ground beef, beans, cheese, enchilada sauce (and hot sauce if desired). Layer another corn tortilla on top and layer ingredients in the same order. If you would like the cheese melted, heat about 30 seconds in the microwave. Add fresh tomatoes, avocados, salad, etc. and serve. If you would like - you can add fresh chopped onions as well. No pictures - sorry we ate them too quickly and I didn't think about getting a picture.
Enjoy!
Tuesday, November 5, 2013
Red Velvet Butter Chews
Ok - finally - I got my new computer and can actually post again. It has been a while and some things have changed in the past couple of weeks that have taken time away, but I will work to start this up again. The recipe for today is one that I found but changed up a bit. It is a very easy recipe that takes a short time to put together. Let me know what you think.
In a medium bowl,
beat cream cheese and eggs for 30 seconds.
Stir in sugar just until combined, then beat on medium speed for 3
minutes until smooth. Spoon the cream
cheese mixture evenly over the bottom layer.
Bake 30 to 35 minutes, until center is set. Remove from oven and let cook on rack at room
temperature. Dust with powder sugar if desired. Slice cookie bars into squares to serve.
Red Velvet Butter Chews
1
box Red Velvet cake mix
1
egg, lightly beaten
1
stick butter, softened
1
(8 oz) package cream cheese, at room temperature
1
cup white chocolate chips
2
eggs
2
cups powder sugar
Preheat
oven to 350 degrees. Line a 9 x 13-inch
baking pan with nonstick foil.
Combine
cake mix, 1 egg and butter with a large spatula or wooden spoon. Keep folding over and pressing mix until it
makes a dough that
resembles
children’s play dough. Using your
fingers, press dough evenly into the bottom of the prepared pan. Sprinkle with the white chocolate chips and
gently press into the dough so they do not roll around.
Friday, October 18, 2013
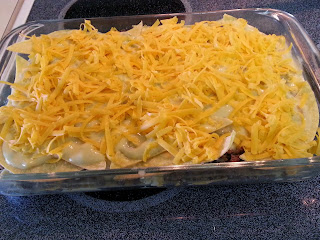
Green Chile Casserole
This is one of my "go to" recipes when I can't come up with something for dinner. It is quick, easy, and with a salad, is a complete meal in one dish. All of that and it tastes great too!


Ingredients pictured above.
1 1/2 lbs. ground beef
1 can evaporated milk
2 cans Cream of Chicken soup
2 small cans of Hatch Fire Roasted Green Chiles (I used one hot and one mild)
Corn Tortillas
Minced onions
Spicy Montreal Steak seasoning
Kosher Salt
2 cups Grated Cheddar Cheese
Brown the ground beef and add Montreal Seasoning, Kosher Salt, and minced onions to the meat as it browns. In a separate bowl, combine the 2 cans of soup, evaporated milk, and green chiles.
Cut tortillas into 4 strips. It took about 10 tortillas for this size casserole.


To finish: The final layer should be tortillas, meat, soup/green chile mix. Top with the grated cheddar cheese. See below.
Bake at 350 degrees for about 20-30 minutes. You want the cheese to be melted and bubbling but not burned. Serve with a tossed salad and chips. Enjoy!
Next - Red Velvet Buttery Chews!
Cut tortillas into 4 strips. It took about 10 tortillas for this size casserole.

To put together: Layer one layer of tortillas on bottom of a 9 x 13 dish or a 3 quart deep dish. Layer about 1/3 of the hamburger over the tortillas; then 1/3 of the soup/green chile mixture over the meat. You can spread grated cheese between the layers if you would like. I did not in this casserole. The picture below shows what the layers look like in the dish.


Bake at 350 degrees for about 20-30 minutes. You want the cheese to be melted and bubbling but not burned. Serve with a tossed salad and chips. Enjoy!
Next - Red Velvet Buttery Chews!
Wednesday, October 2, 2013
Dessert Anyone?
This recipe is one that is truly easy but looks and tastes like it is really complicated. Actually, pies are very easy to make as long as you get the pie crust recipe correct. The crust is what sets a pie apart as okay or outstanding!
In the introductory post, recipes and suggestions were given for Sunday dinner but the teaser was that dessert would be the next post. Buttermilk Chess Pie is one of my spouse's favorite pies. It has a few simple ingredients so let's get going.
Bake in the preheated oven
for 45 minutes, or until filling is set.
Again - the pie crust is essential to a really great pie. There are a couple of tricks to making a good pie crust. 1) Be sure shortening is ice cold and water is cold, almost to the point of freezing; 2) Do not add too much flour or overwork the dough as it will make a tough pie crust.
This is a secret recipe that has been in my family for generations (well at least 2 generations - my mom and me), so - raise your right hand and solemnly swear that you will never, NEVER tell another soul this recipe. Now we're ready to get started.
Pie Crust (makes 3 single pie crusts)
3 cups flour
1/4 cup sugar (omit if pie crust is not for a dessert pie)
1 cup shortening, chilled
1 egg
1 Tbsp. White Vinegar
7 Tbsp. cold water
Measure flour and sugar into a large bowl and give a quick stir to combine. Add shortening and using a pastry blender (or 2 knives), cut shortening into flour until mixture resembles fine crumbs. In a small bowl lightly beat egg, then add vinegar and 5 tbsp. cold water. Stir together. Make a well in the center of the flour mixture and add egg mixture. Stir with a fork until well combined. If needed, add 1 tbsp. of water at a time, to get pastry to hold together. (Again - don't add too much water or you will have to add more flour, which makes a tough pie crust). You can use your hands to finish combining pastry but only at the very end. Your hands add warmth to the pie crust and may cause it to be too moist. Once you have your crust ready, divide into 3 balls. Wrap 2 of the pie crust dough balls, individually, in plastic wrap and place in freezer bags; label, date and place in freezer to use at a later date.
Sprinkle flour onto counter top (or a pie board); place remaining ball of dough in center and press down lightly to make a circular disc. Roll out until dough is fairly thin and is about 1" beyond the size of pie pan. Fold dough in half (looks like a half moon), then fold in half again. Very easily lift, dust flour off edges, place point of circle in the middle of pie pan. Carefully unfold crust to fit pan. If needed, you can lift crust and move around, but be careful not to tear or stretch too much. Press the crust down, slightly, in the pie pan. Fold under the edges so the crust sits just outside the edge of the pie pan, then finish the edges. (might be a video post at some time).
There you have it! Buttermilk Chess Pie with Homemade Pie Crust! MMMMM good! It truly was scrumptious!
I will be out of pocket beginning tomorrow as I am working at the Texas State Fair in Dallas, giving away FREE Soft Serve Ice Cream at the Southwest Dairy Farmers booth. If you're in the area, stop by and say "Hello!" Enjoy and have a blessed weekend!
In the introductory post, recipes and suggestions were given for Sunday dinner but the teaser was that dessert would be the next post. Buttermilk Chess Pie is one of my spouse's favorite pies. It has a few simple ingredients so let's get going.
Buttermilk Chess Pie (Recipe from Allrecipes.com)
(Original
recipe makes 1 - 9 inch pie )
2
cups white sugar
2
tablespoons all-purpose flour
5
eggs
2/3
cup buttermilk
1/2 cup melted butter
1 teaspoon vanilla
extract
1 (9 inch) unbaked pie
crust (recipe below)
Preheat oven to 350 degrees F (175 degrees C.)
In a large bowl, combine sugar and flour. Beat in the eggs and
buttermilk until blended. Stir in the melted butter and vanilla. Pour filling
into the pie crust.
Again - the pie crust is essential to a really great pie. There are a couple of tricks to making a good pie crust. 1) Be sure shortening is ice cold and water is cold, almost to the point of freezing; 2) Do not add too much flour or overwork the dough as it will make a tough pie crust.
This is a secret recipe that has been in my family for generations (well at least 2 generations - my mom and me), so - raise your right hand and solemnly swear that you will never, NEVER tell another soul this recipe. Now we're ready to get started.
Pie Crust (makes 3 single pie crusts)
3 cups flour
1/4 cup sugar (omit if pie crust is not for a dessert pie)
1 cup shortening, chilled
1 egg
1 Tbsp. White Vinegar
7 Tbsp. cold water
Measure flour and sugar into a large bowl and give a quick stir to combine. Add shortening and using a pastry blender (or 2 knives), cut shortening into flour until mixture resembles fine crumbs. In a small bowl lightly beat egg, then add vinegar and 5 tbsp. cold water. Stir together. Make a well in the center of the flour mixture and add egg mixture. Stir with a fork until well combined. If needed, add 1 tbsp. of water at a time, to get pastry to hold together. (Again - don't add too much water or you will have to add more flour, which makes a tough pie crust). You can use your hands to finish combining pastry but only at the very end. Your hands add warmth to the pie crust and may cause it to be too moist. Once you have your crust ready, divide into 3 balls. Wrap 2 of the pie crust dough balls, individually, in plastic wrap and place in freezer bags; label, date and place in freezer to use at a later date.
Sprinkle flour onto counter top (or a pie board); place remaining ball of dough in center and press down lightly to make a circular disc. Roll out until dough is fairly thin and is about 1" beyond the size of pie pan. Fold dough in half (looks like a half moon), then fold in half again. Very easily lift, dust flour off edges, place point of circle in the middle of pie pan. Carefully unfold crust to fit pan. If needed, you can lift crust and move around, but be careful not to tear or stretch too much. Press the crust down, slightly, in the pie pan. Fold under the edges so the crust sits just outside the edge of the pie pan, then finish the edges. (might be a video post at some time).
There you have it! Buttermilk Chess Pie with Homemade Pie Crust! MMMMM good! It truly was scrumptious!
I will be out of pocket beginning tomorrow as I am working at the Texas State Fair in Dallas, giving away FREE Soft Serve Ice Cream at the Southwest Dairy Farmers booth. If you're in the area, stop by and say "Hello!" Enjoy and have a blessed weekend!
Sunday, September 29, 2013
Introduction to a New Blog
This is a new blog for me. There are lots of food bloggers out there so I decided to join the fun. I love cooking and have lots of recipes that I use and my family enjoys (which you will be able to see when I finally get a picture taken of my recipe box!) and I obnoxiously love Texas. I also am often asked for my recipes when I take food to different events - church, work, social groups. In light of these, I hope to post a couple of recipes a week and may occasionally include menu planning, holiday specials and tips for new cooks.
Today's dinner was actually the inspiration for the blog and honestly, it was super easy to prepare. Sunday is a day that I look for things that can be done ahead of time and can cook while we are at church. I started with a bone-in chuck roast. In a large dutch oven on the stove, I heated olive oil on high heat and seared both sides of the roast. (Searing just means browning the roast). Then, in the same pan covered, into the oven at 275 degrees it goes. It cooked for about an hour then I added about 3 cups of Red Mud Barbecue Sauce (http://www.redmudbbq.com). This sauce is awesome and is produced by friends of ours in the Panhandle of Texas! Love, Love, Love this sauce - just a little spicy with excellent flavor! Then just let the juices and sauce do their thing with the roast for about 4 more hours or until you're ready. The low temperature allows the roast to cook and the sauce helps to keep it nice and moist and very tender. It was falling off the bone when lunch was ready and had such great flavor but was not dry at all. The roast was from beef we purchased from Cattleman's Choice Feedyard (http://www.cattlemanschoicefeedyard.com). They have excellent beef and anyone may purchase beef from them. The link is to their website.
To go along with the roast, I served Bacon, Cheddar Chipotle mashed potatoes (Ok - I admit - they were instant Idahoan potatoes but they were excellent). You can prepare your own by peeling, cutting into chunks, cooking and mashing potatoes; then add bacon bits, cheddar cheese and a chopped chipotle pepper with adobo sauce. To round out the meal - fried okra (my spouse's favorite). I do not like the prebreaded okra from the store and actually prefer fresh okra but it is not available at this time of year. I used frozen cut okra from the freezer section of the store and prepared my own breading.
Breading Recipe
1 egg
1 cup milk
1 tsp baking powder
1 cup flour (may need more or less - start with 1/2 cup and add tablespoon at a time)
1/2 cup yellow corn meal
1 tsp salt
Beat egg slightly; add milk and stir. Add baking powder and flour; whisk until smooth. Add corn meal and salt and continue to whisk. Add the frozen or thawed okra and stir to coat the okra. Heat 1 1/2 cups of shortening in large skillet. Be sure there is enough oil in the pan before adding okra. Add okra to hot oil by spoonfuls. Cook over medium high heat, using a spoon to break apart as it cooks. Be sure you keep an eye on the okra as it will burn quickly once it is cooked. Use a slotted spoon to take okra from pan once it is browned and crunchy. Be sure to get all the crunchies in the pan - they are the best!
If you have any questions, give me a shout!
Dessert - Buttermilk Chess Pie - next post :)
Subscribe to:
Comments (Atom)